DIY Puzzle Board: An Easy Step-by-Step Guide to Build Your Own
The Essential Puzzle Board Build Sheet
A standard puzzle board for up to 1000-piece puzzles is typically 36 by 26 inches, providing a clear size target for your project. You can complete a basic build in a single day, and for an even simpler option, a portable board can be made from a basic tri-fold display board with minimal tools. Adding a soft fabric surface like felt is a key upgrade that prevents pieces from sliding. As you plan your project, you might also consider different puzzle box storage ideas to keep your entire puzzling area organized.
What Exactly Is a Puzzle Board?
A puzzle board is a portable, dedicated work surface with a raised border that allows you to assemble and safely store in-progress jigsaw puzzles. Its primary features include a smooth, non-slip surface and a frame to prevent pieces from falling off. Some boards are intentionally designed with an open side, which allows a completed puzzle to be easily slid off for gluing or framing. Understanding these basic functions is the first step, but learning how to use a puzzle board effectively will maximize its benefits.
Why Build a DIY Puzzle Board?
Building a DIY puzzle board allows for total customization to fit your space and style, offers significant cost savings, and enhances your puzzling experience by protecting your work. By making your own, you can create a board that perfectly fits your home and add custom features like sorting drawers, a tilting easel, or a protective cover. Building your own is also significantly cheaper than buying a pre-made one; you can even start by upgrading a thrifted board for as little as $12.00. Ultimately, a dedicated board protects your work from pets, dust, and accidental bumps, providing the perfect stage for your collection of jigsaw puzzles.
Choosing Your Foundation: 3 DIY Puzzle Board Paths
You can build a durable wooden puzzle board from scratch, create a lightweight portable version from a cardboard tri-fold, or upcycle a used board from a thrift store. Each path offers distinct advantages depending on your tools, budget, and needs. For a simpler, no-build alternative that is also portable, you could learn how to make a puzzle mat as another option.
- The Wooden Board: This is the most durable and customizable option. Use a base of 1/2" plywood for a lighter board that is still plenty strong, or opt for 3/4" plywood for maximum rigidity. Particleboard is another suitable base material.
- The Portable Cardboard Board: Ideal for those with limited tools or space, a standard tri-fold display board can be quickly converted into a lightweight, foldable, and easily storable puzzle surface.
- The Upcycled Board: Source a used puzzle board or a suitable item like a large cork bulletin board from a thrift store or yard sale. Before buying, check for deal-breakers like severe warping, cracks, or water damage. Minor issues like loose joints can be fixed with wood glue, but missing drawers are a major red flag that should make you pass.
The Board Builder's Protocol: From Raw Materials to Finished Board
The building process involves four main steps: preparing the base, constructing the frame, finishing the surfaces, and integrating functional upgrades like handles and a cover. Following this protocol will guide you from raw materials to a finished, custom puzzling station.
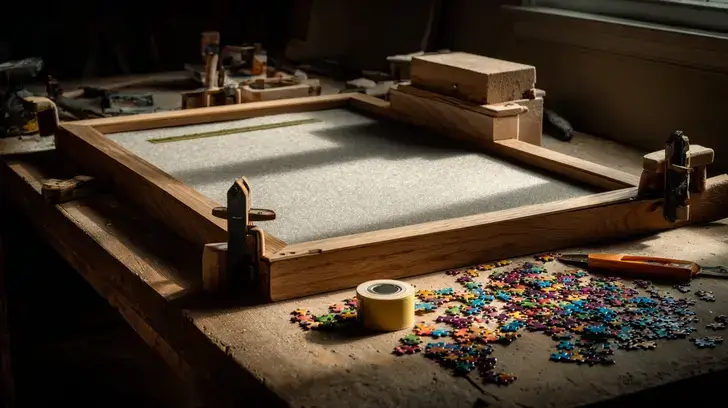
- STEP 1: Select and Prepare the Base. Cut your base material, such as plywood, to your desired dimensions. A standard size for 1000-piece puzzles is 36" x 26". Sand all surfaces and edges smooth with 200-grit sandpaper, but be careful not to sand through the thin top veneer on plywood.
- STEP 2: Construct and Attach the Frame. Cut wood trim to create the border. For professional-looking mitered corners, cut the ends of your trim pieces at 45-degree angles using a miter box. Alternatively, simple butt joints are easier and perfectly functional. Attach the frame to the base using wood glue and clamps, then secure it further with a brad nailer using 1 1/4" brad nails. For very thin trim, a 23-gauge pin nailer is ideal to prevent the wood from splitting.
- STEP 3: Finish the Surfaces. Apply your desired finish to the wood frame, such as paint, stain, or wax. For the main puzzling surface, attach a soft-touch fabric like felt or flannel using spray adhesive. Choose a neutral color that won't visually compete with your puzzle pieces. To prevent fraying, wrap the fabric around the edges to the back of the board and secure them with duct tape.
- STEP 4: Integrate Functional Upgrades. Add cabinet handles for easy transport by drilling holes and countersinking the screws. Create a protective cover from clear acrylic, plexiglass, or thick clear vinyl to shield your puzzle from dust and pets. For more ergonomic puzzling, build a simple tilting easel with wood strips and hinges. Finally, apply felt feet to the bottom of the board to prevent it from scratching tables or other surfaces.
Common Pitfalls: What to Avoid in Your DIY Build
To ensure a successful build, always use safety glasses, don't overcomplicate the frame with perfect mitered corners on your first try, and avoid adding a heavy, unnecessary rotating base. These common mistakes can add frustration and cost without improving the final product.
- PITFALL 1: Skipping Safety Measures. Always wear safety glasses when operating any power tools. This is a non-negotiable rule whether you are using saws, drills, or nail guns.
- PITFALL 2: Overcomplicating the Frame. Don't stress about perfect mitered corners on your first build. Butt joints are perfectly functional and much simpler to execute. For accurate cuts without complex math, use referential measurements by marking your cut lines directly from the project pieces themselves.
- PITFALL 3: Adding an Unnecessary Lazy Susan. While a rotating base seems appealing, it adds significant weight, complexity, and cost to a DIY project. An ergonomic tilt provided by a simple easel is far more valuable for comfort during long puzzling sessions.
The Final Result: Your Custom Ergonomic Puzzling Station
The final result is a dedicated, ergonomic puzzling station that protects your work, frees up your table, and is customized with features that make your hobby more enjoyable. You now have a permanent, reliable home for your hobby, meaning your dining room table is free again and your in-progress work is always safe and organized. By adding an easel, you've created a more comfortable setup that reduces neck and back strain, allowing you to puzzle for longer. Your board is tailored to your needs, with features like a protective cover and easy-carry handles that make the entire process more seamless. To complete your ideal puzzling environment, ensure you have the best lighting for jigsaw puzzles at your new station.
Frequently Asked Questions
What is a good size for a DIY puzzle board?
For puzzles up to 1000 pieces, a standard size of 36 by 26 inches is an excellent target. This provides ample space for both assembly and sorting loose pieces. Always measure your largest puzzle boxes to ensure your custom board will fit your needs.
What is the best surface for a puzzle board?
The best surface is a soft, non-slip fabric like felt or flannel, attached with spray adhesive. This material prevents pieces from sliding around, especially if the board is tilted, and makes them easier to pick up. Choose a neutral, solid color that won't visually compete with your puzzle pieces.
What are the main options for a DIY puzzle board?
There are three primary paths for a DIY board. You can build a durable wooden board from scratch for maximum customization, create a lightweight portable version from a cardboard tri-fold with minimal tools, or upcycle a used board or large cork bulletin board from a thrift store for a budget-friendly option.
Can you use a cork board as a puzzle board?
Yes, a large cork bulletin board is an excellent choice for a puzzle board base. The cork surface is naturally non-slip, which is great for keeping pieces from sliding around. You can use it as-is or easily add a simple wood trim frame to contain the pieces.
How do you make a simple puzzle board without many tools?
For a simple project with minimal tools, convert a standard tri-fold display board. Simply use spray adhesive to cover the interior surface with a piece of felt. This creates an instant, lightweight, and foldable puzzle board that can be easily stored away.
How can you add sorting drawers to a DIY puzzle board?
To add drawers, you must build a deeper base frame that creates a cavity beneath the main puzzle surface. You can then construct simple, shallow boxes from thin particleboard or plywood to slide into this open space. This is an advanced feature that adds significant utility for sorting pieces.
Why do some puzzle boards have an open side?
A puzzle board with a frame on only three sides is designed for easy puzzle preservation. The open side allows you to slide a finished puzzle smoothly off the board and onto another surface for gluing or framing, without having to risk breaking it apart by lifting it.
What should you do if the wood splits when nailing the frame?
If a piece of wood trim splits while you are nailing it, the fix is simple. Apply a small amount of wood glue directly into the crack, then use a clamp to press the split tightly together. Wipe away any excess glue and let it dry completely before proceeding.


