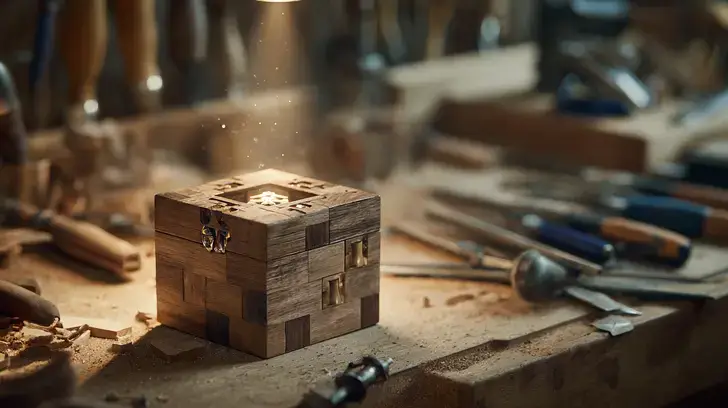
How to Make a Puzzle Box: A Simple Step-by-Step Guide
The Enigma Box Engineer's Briefing
Building a puzzle box is a highly rewarding project where you can choose between heirloom-quality wood or beginner-friendly cardboard, with the "magic" of the lock coming from a simple mechanical principle. You can create a sophisticated wooden box for a lasting treasure or a simple cardboard version for a fun, accessible craft. The secret isn't complex; it relies on a basic mechanism like hidden sliding pins in a wooden box or brads moving in a track in a cardboard one. For a professional-looking wooden box, the key is making precise, consistent cuts—using a stop block on your saw and cutting clean 45-degree miters for the corners are the critical first steps. Ultimately, a puzzle box is an excellent DIY project and one of the best jigsaw puzzle storage ideas for creating a unique solution to hide treasures or give as a memorable gift.
What Exactly Is a Puzzle Box?
A puzzle box is a container that requires a non-obvious or secret series of steps to open it. Its appeal comes from a unique combination of craftsmanship, the intellectual challenge of discovering its opening mechanism, and its practical function as a secure and mysterious place to hide small treasures or gifts.
Why Build a Puzzle Box?
Building a puzzle box offers the deep satisfaction of a DIY project that results in a unique, functional piece of art, perfect as a custom gift or a secret storage compartment. If you enjoy the challenge and reward of jigsaw puzzles, you'll appreciate the similar blend of patience and payoff in this project. It's the ultimate custom gift, perfect for holidays or special occasions, and can even be themed for the recipient. More than just a container, a puzzle box serves as a secret compartment to protect valuables or simply to add an element of mystery and fun to your storage.
How the "Magic" Works: Understanding the Mechanisms
The "magic" of a puzzle box relies on simple physics: a wooden box often uses centrifugal force to move hidden locking pins, while a cardboard version uses sliding brads in a track. For the wooden box, the mechanism is based on centrifugal force. When you spin the box, internal locking pins—which are just simple nails—slide outward from their slots due to the force, freeing the lid and allowing it to be removed. The cardboard version uses a track-and-brad system where small metal brads are inserted into the box. These brads slide within hidden tracks, acting like bolts that lock or unlock the lid when moved into the correct positions.
Choosing Your Path: Wooden Box vs. Cardboard Box
Choose a wooden box for a durable, heirloom-quality project if you have woodworking tools, or opt for the accessible, beginner-friendly cardboard version for a quick and easy build. The wooden box is the more durable, heirloom-quality option that can be made from beautiful contrasting woods like walnut and maple. It requires tools like a table saw, miter saw, drill press, and clamps, along with materials like wood glue and nails. The cardboard box is the accessible, beginner-friendly option perfect for kids or a first-time project. It only requires a printable template, cardstock, cardboard, scissors, an X-acto knife, brads, glue, and wrapping paper. Before you start, remember that a box is for storage. If you need a surface for active puzzle solving, you might want to learn how to make a puzzle board instead.
The 4-Step Precision Box Framework: Building Your Wooden Box
Building a wooden puzzle box involves four key stages: precisely preparing your panels, assembling the box, installing the internal locking mechanism, and applying a smooth, professional finish.
STEP 1 (PREPARE YOUR PANELS):
- Cut four 5" side panels. Use a stop block on your saw to ensure every piece is identical.
- Using a table saw, cut a 1/4" deep slot in the side panels to hold the bottom piece.
- Miter the corners of all four side panels at a perfect 45-degree angle.
- Resaw a thin bottom panel (approximately 1/8" thick) from a thicker board, preferably using a band saw for precision.
- Cut the lid to its final size, such as 4" x 4" x 0.5".
STEP 2 (ASSEMBLE THE BOX):
- Lay the mitered side panels flat and use painter's tape to connect them along the outside edges.
- Apply wood glue to the mitered edges and into the slot for the bottom panel.
- Insert the bottom panel, which should be cut slightly undersized to allow for movement. Fold the sides up and clamp the assembly together. Use strap clamps for even pressure on all corners and let the glue dry overnight.
STEP 3 (INSTALL THE LOCK):
- Cut and drill the two-part wooden locking mechanism piece (e.g., 4" x 1.875" x 0.5"), ensuring the holes for the nails are equally spaced and slightly larger than the nail diameter.
- Split the mechanism piece in half and glue one half to the inside walls of the box.
- Insert 2" nails into every other slot of the installed mechanism.
- Cut and glue lid supports to the inside faces of the box, making sure they are flush with the mechanism and do not obstruct the nails.
- Glue the second half of the mechanism to the lid's underside and add nails to the remaining holes.
- Glue a thin wood strip over the mechanism to act as a stop for the nail heads.
STEP 4 (NEATLY FINISH):
- Sand all surfaces, starting with 150-grit sandpaper and progressing to a smooth 220-grit.
- Apply a finish like shellac with a lint-free cloth, wiping away any excess to prevent pooling.
- Once the finish is dry, lightly sand it with 600-grit sandpaper and buff the surface with #00 steel wool for a silky-smooth feel.
- Attach a knob to the center of the lid to complete the project.
The Beginner's Build: Assembling a Cardboard Puzzle Box
To make a cardboard puzzle box, simply glue a template to cardboard, score and cut the pieces, install the brad-based locking mechanism, and then fold and glue the box into its final shape.
- STEP 1: Begin by gluing the printable template pieces directly onto your cardboard. This makes cutting more accurate.
- STEP 2: Use an X-acto knife to lightly score the cardboard along all fold lines. This ensures your folds will be clean and crisp.
- STEP 3: Insert the metal brads into the pre-marked holes on your template pieces to create the sliding lock. Secure the back of each brad with a small dab of glue to hold it in place.
- STEP 4: Fold the cardboard pieces into their box shapes and glue the tabs together. Use rubber bands to act as clamps, holding the box securely while the glue dries completely.
- STEP 5: Wrap the finished box in decorative wrapping paper. Carefully use your knife to cut away the paper over the tracks and brads. Tape down the cut edges of the paper to ensure the mechanism operates smoothly. Add a decorative bow for a final touch.
Common Pitfalls and Pro-Tips for a Perfect Build
Avoid common pitfalls like inconsistent cuts by using a stop block, prevent messy glue-ups with painter's tape, and fix a wobbly box by wedging a husky pad under the handle.
- PITFALL 1 (INCONSISTENT CUTS): Uneven panels are the number one cause of a poorly fitting box with gaps.
- PRO-TIP: Always use a stop block on your miter saw or cross-cut sled. This guarantees that every parallel piece is the exact same length, leading to tight, professional joints.
- PITFALL 2 (MESSY GLUE-UP): Excess glue can squeeze out and ruin a wood finish, while weak joints can cause the entire box to fail.
- PRO-TIP: For wooden boxes, apply painter's tape to the outside of your mitered corners before gluing. It will catch any squeeze-out and peel away cleanly. For cardboard, use rubber bands as simple, effective clamps to hold pieces tight while the glue sets.
- PITFALL 3 (A WOBBLY BOX): Sometimes, even a well-built box can feel unstable or wobble on a flat surface.
- PRO-TIP: If your finished wooden box wobbles, you can often fix it instantly by wedging a husky pad between the box and any handle or knob.
Your Finished Masterpiece: A Functional Work of Art
Your completed puzzle box is more than just a container; it's a handcrafted work of art that holds a secret, representing your skill and creativity. Congratulations on finishing your project! You now have a handsome, handcrafted box that is ready to be used as a unique storage piece or given as a clever, unforgettable gift. You have successfully transformed from an anxious novice into a confident builder who has created something both beautiful and functional. Now that you've mastered a custom storage solution, you might be interested in other DIY accessories. For example, you could learn how to make a puzzle mat to enhance your hobby even further.
Frequently Asked Questions
What is the 'magic' behind how a puzzle box works?
The 'magic' relies on simple mechanical principles. A wooden box typically uses centrifugal force from spinning to move hidden nail pins, unlocking the lid, while a cardboard version uses metal brads that slide in hidden tracks to act as bolts.
What are the main differences between building a wooden and a cardboard puzzle box?
A wooden box is a durable, heirloom-quality project requiring woodworking tools and skills, ideal for a lasting gift. A cardboard box is a beginner-friendly craft that is quick, accessible, and perfect for kids, requiring only basic materials like a template, cardboard, and glue.
What is the most critical step for making a professional-looking wooden puzzle box?
The most critical step is making precise, consistent cuts for all your panels. Using a stop block on your saw to ensure every piece is identical and cutting clean 45-degree miters for the corners are essential for tight joints and a gap-free finish.
How can I make a holiday-themed puzzle box?
To create a holiday-themed box, use materials and colors associated with the occasion. For a wooden box, you could use festive wood stains or paint, while a cardboard box can be wrapped in themed paper and decorated with bows or other embellishments.
What can I use for a cheap puzzle board?
A simple cork board from an office supply store makes an excellent and cheap puzzle board. A 2'x3' board is large enough for a standard 1000-piece puzzle, while a 3'x4' board can accommodate a 3000-piece puzzle with room to spare.
How do I fix a wooden puzzle box that wobbles?
An easy and effective fix for a wobbly box is to wedge a husky pad between the box body and the handle or knob. This small addition often provides enough stability to eliminate the wobble instantly.


