How to Make a Puzzle From Scratch: A Complete DIY Guide
The Scratch-Built Puzzle Primer
You can create a beautiful, custom puzzle using simple materials you already have, like a clean cereal box. For a professional finish without the mess of glue, using sticker paper or printable vinyl for your image is the best approach. This guide will walk you through the entire process of making your own puzzle from scratch.
- Start with what you have. You don't need expensive materials to begin. A simple puzzle can be made from clean, flat cardboard, making this a highly accessible project.
- Avoid messy glue. Using sticker paper for your image is the secret to a clean, professional look. This technique prevents the bubbling and warping that can happen with liquid glue.
- Unleash your creativity. The design is entirely up to you. You can use your own artwork, your kids' drawings, or even paint a design directly onto a wooden base for a truly one-of-a-kind creation.
This guide focuses on showing you how to create a completely custom DIY jigsaw puzzle from the ground up, letting you choose your own materials, design, and cutting method.
Why Build a Puzzle? More Than Just a Pastime
Making and solving a puzzle offers real psychological and developmental benefits, from reducing stress to improving fine motor skills. It's a rewarding activity that engages your mind and hands in a focused, calming way.
Engaging with puzzles is more than just a hobby; it's a valuable exercise for your brain and well-being.
- Stress Relief: The focused attention required for a puzzle is a proven method for stress relief, as it can significantly decrease cortisol levels in your body.
- Pattern Recognition: The process of sorting and assembling pieces sharpens your pattern-recognition skills, which is one reason puzzles are often enjoyed by people with dyslexia.
- Motor Skills: For all ages, the physical act of handling and placing pieces helps develop fine motor skills, finger strength, and hand-eye coordination.
While the satisfaction of a DIY project is immense, sometimes you might want a professionally crafted puzzle with a specific photo. In those cases, you can order high-quality customized photo puzzles without the hands-on work.
Your First Choice: Choosing Your Puzzle's Foundation
Your most important decision is the base material, which boils down to two main paths: beginner-friendly cardboard or heirloom-quality wood. Each has its own set of tools and requirements that will shape your project.
The Cardboard Method (Beginner-Friendly)
- Base Material: Use thin, sturdy paperboard (like from a cereal box) or any clean, flat cardboard. The ideal thickness is around 1/8 inch (0.3 cm) to ensure the pieces are durable but easy to cut.
- Cutting Tools: A sharp hobby knife, like an X-acto knife, is perfect for this method. Always use a cutting mat underneath to protect your work surface.
The Wood Method (Heirloom Quality)
- Base Material: For a durable, classic feel, use 6mm thick plywood. This creates a puzzle that can last for generations.
- Preparation: Before you begin, the wood must be sanded smooth with 120- to 220-grit sandpaper. Rounding the sharp corners also gives it a more polished, professional finish.
- Cutting Tools: This method requires more advanced tools. A scroll saw is the most common choice for its precision and ability to cut intricate shapes.
When creating a puzzle for younger children, the cardboard method is often the safest and most practical choice. It allows for simpler designs and easier cutting, making it a great way to learn how to create a kids puzzle that they can enjoy.
The Artisan Puzzle Protocol: Your 4-Step Creation Plan
This four-step plan breaks the process down into manageable stages: designing, adhering the image, creating a template, and cutting the pieces. Following these steps will guide you from a simple piece of cardboard to a finished, playable puzzle.
1. Design & Prepare
First, choose your puzzle's image. This can be a high-resolution photograph, your own artwork, or a design you paint directly onto the base. Remember that a more detailed image is generally easier to solve, while large areas of uniform color will make it more challenging.
Using photo editing software, scale your image to the exact dimensions of your cardboard or wood base. It’s always a good idea to do a test print on regular paper first to ensure the size is perfect.
While you can print your image on regular paper, using sticker paper is highly recommended for a bubble-free finish, which is essential when you want to learn how to make a puzzle from a photo.
2. Adhere & Seal
Attach your image to the base material. If you're using sticker paper, carefully peel the backing and smooth it down with a ruler or credit card to eliminate any air bubbles. If you're using glue, apply a thin, even layer and let it dry completely for at least one hour.
For painted wooden puzzles, allow the paint to dry overnight. If you need to sketch your design first, use a pencil no harder than an HB grade to avoid leaving impressions in the wood.
Finally, protect the puzzle's surface. In a well-ventilated area, spray a thin coat of lacquer or picture varnish over the image. For wood, you can also use oil-based polyurethane or a 50:50 mix of transparent white polish and isopropyl alcohol. Let the sealant harden for at least 24 hours before moving on.
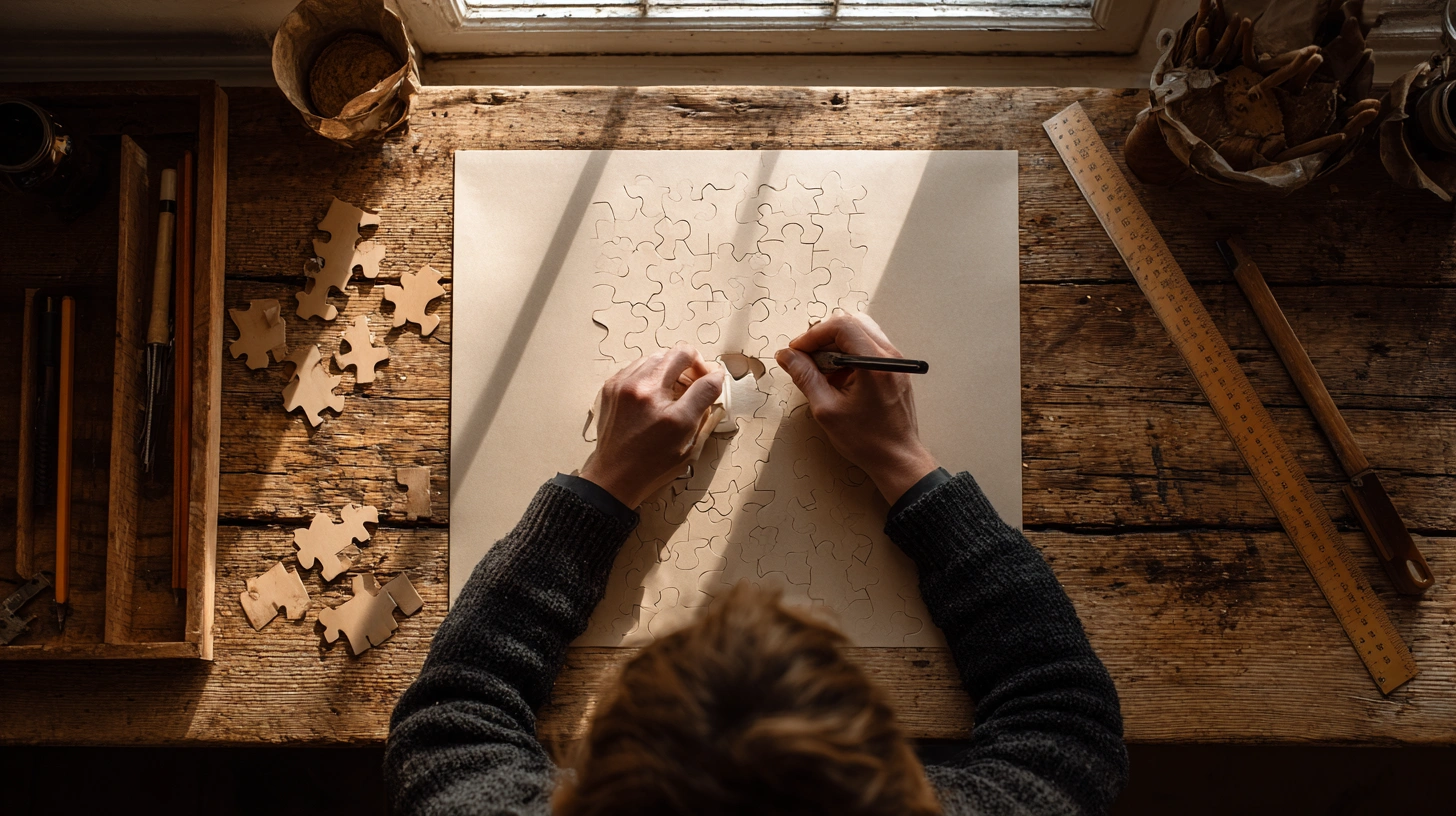
3. Template & Trace
Flip the puzzle over to the blank back. Using a ruler and pencil, draw a grid of squares—a common size is 3/4 inch or 1 inch squares—to guide your piece shapes.
Along the grid lines, sketch the classic interlocking ball-and-socket shapes. If you're not confident drawing them freehand, you can easily find a printable puzzle template online.
For cardboard, you can glue the paper template directly to the back. For wood, use carbon paper and a ballpoint pen to transfer the template lines onto the surface.
4. Cut & Finish
Now you're ready to cut. To make the process easier to handle, first cut the puzzle into long rows or columns along your grid lines. Then, you can focus on cutting out the individual pieces from each strip.
For cardboard, use a precise hobby knife and be sure to change the blade as soon as it gets dull to ensure your cuts are clean and not torn. For wood, hold the board firmly against your work surface to prevent it from lifting while you use a scroll saw.
After cutting, perform the finishing touches. Erase any remaining pencil marks from the back of the pieces. For wooden puzzles, carefully sand the sawn edges of each piece to remove splinters and ensure they fit together smoothly.
Sidestepping Setbacks: Common DIY Puzzle Pitfalls
You can avoid the most common frustrations, like bubbles and torn edges, by using the right techniques and materials from the start. A little preparation and care will ensure your final puzzle looks clean and professional.
- Pitfall: Bubbles and Wrinkles. This is almost always caused by using too much liquid glue. The best way to prevent this is to use sticker paper instead. If you must use glue, apply it sparingly and use a ruler to smooth the paper from the center outwards.
- Pitfall: Ragged or Torn Edges. A dull blade is the culprit here. When cutting cardboard with a hobby knife, change your blade as soon as you feel it start to drag or tear the paper instead of slicing it cleanly.
- Pitfall: Unsafe Cutting Practices. Always prioritize your safety. Use a cutting mat to protect your work surface and your knife blade. When using any type of saw, wear cut-proof gloves and safety goggles, and ensure children have adult supervision.
- Pitfall: Wood Splintering or Lifting. This happens when the wood isn't held down securely during cutting. Hold the board down firmly as you cut. For extra stability, you can even use painter's tape to hold rows together when making perpendicular cuts.
From Scraps to Satisfaction: The Finished Product
With all the pieces cut and finished, your custom puzzle is now complete and ready for its first assembly. The final step is to give every piece a quick inspection for any rough edges or leftover pencil marks.
For wooden puzzles, you can add a truly professional touch by staining or painting the sanded edges of each piece. This gives the puzzle a beautiful, heirloom-quality finish.
Store your completed puzzle pieces in a resealable plastic bag or a custom-decorated box. This will keep them safe, organized, and ready for you or a loved one to enjoy.
Frequently Asked Questions
What's the best way to make a puzzle without using messy glue?
The best method for a clean, professional finish is to print your image on sticker paper or printable vinyl. This avoids the bubbling and warping that often happens with liquid glue, ensuring your image adheres smoothly to the puzzle base.
What materials do I need to make a simple puzzle at home?
You can start with simple materials you likely already have. A clean, flat piece of cardboard, like from a cereal box, makes an excellent base, and a sharp hobby knife is the only cutting tool you need for a beginner-friendly project.
What are the main differences between making a cardboard and a wooden puzzle?
The primary differences are the base material and cutting tools. Cardboard puzzles are beginner-friendly, using thin paperboard and a hobby knife, while heirloom-quality wooden puzzles require 6mm plywood and a power tool like a scroll saw for cutting.
What are the benefits of making and solving puzzles?
Engaging with puzzles offers significant psychological benefits, including stress relief by lowering cortisol levels. It also sharpens pattern-recognition skills and helps develop fine motor skills and hand-eye coordination in both children and adults.
Do puzzles lower cortisol?
Yes, studies have shown that the focused attention required to solve a puzzle can significantly decrease cortisol levels in the body. This makes puzzle-solving an effective and enjoyable activity for stress relief.
Are puzzles hard for people with dyslexia?
On the contrary, puzzles are often very appealing to people with dyslexia. The process of sorting and assembling pieces heavily involves pattern recognition and pattern-building skills, which can be a strength.
Do puzzles help with hand-eye coordination?
Absolutely. The physical act of picking up, turning, and placing puzzle pieces is excellent for developing fine motor skills. This process strengthens finger muscles and improves hand-eye coordination for all ages.
What's the fastest way to build a puzzle?
To solve a puzzle quickly, start by sorting all the pieces and building the border first. Next, assemble the most obvious or detailed sections of the image, and save the most challenging areas, like solid colors, for last.
What kind of saw is best for cutting a wooden puzzle?
A scroll saw is the most common and recommended tool for cutting wooden puzzles due to its precision and ability to handle intricate shapes. Other options include a treadle fretsaw or a jigsaw, but a scroll saw offers the most control for classic puzzle piece cuts.
How do I prevent wood from splintering when cutting puzzle pieces?
To prevent splintering, hold the wood firmly against your work surface so it doesn't lift while cutting. For added stability, you can use painter's tape to hold rows together when making perpendicular cuts, ensuring cleaner results.


